• Skip to primary navigation
  • Skip to main content

Digital and Computational Studies Blog

Bowdoin College - Brunswick, Maine

  • Home
  • Research Opportunities
  • Courses
  • Events
  • Faculty and Staff
  • About the DCS Blog
  • Show Search
Hide Search

Student Research

Oracle MySQL Tutorial

May 18, 2016 By Gina Stalica '16

This tutorial comes from the official MySQL website, which is technically under the ownership of Oracle.  Oracle is a global software and technology company, whose services are widely used – likely by many of the technologies you use every day.  MySQL alone is used to power the functionality of Twitter, Facebook, YouTube, and much more.

Screen Shot 2016-03-30 at 10.23.50 PM

While the MySQL documentation available on this site extends far, far beyond its tutorial, the tutorial itself can be found here.  Oracle offers users very direct walkthroughs of connecting to the MySQL server, creating and using databases, entering queries, getting information about databases, using MySQL in batch mode, and using MySQL with Apache.  The guidance is straightforward, yet thorough, but it certainly assumes a certain level of user knowledge.

Pros:

  • Reputable:  Since Oracle created MySQL, the company certainly knows MySQL best.  This is the most reliable MySQL resource available.  This is especially important to users who may be troubleshooting, as the site is far more likely to be correct than your average StackOverflow post.
  • Straight to the point:  As was mentioned, Oracle knows how MySQL should work better than any other resource.  This tutorial is reliable without any excess information.
  • Thorough directions:  Though the tutorial is straightforward, it does cover all of the essential information needed to get started with MySQL – and, likely, needed to fix certain problems that even seasoned database designers may need.  With every explanation comes an example straight from the
Oracle provides useful examples
Oracle provides users with useful examples

Cons:

  • Straight to the point:  One may notice that this very quality was also listed as a “Pro.”  Oracle assumes that users have an understanding of such topics as batch mode and Apache.  It does not take time to explain anything extremely thoroughly, which may prove to be limiting to users who are new to programming or MySQL.
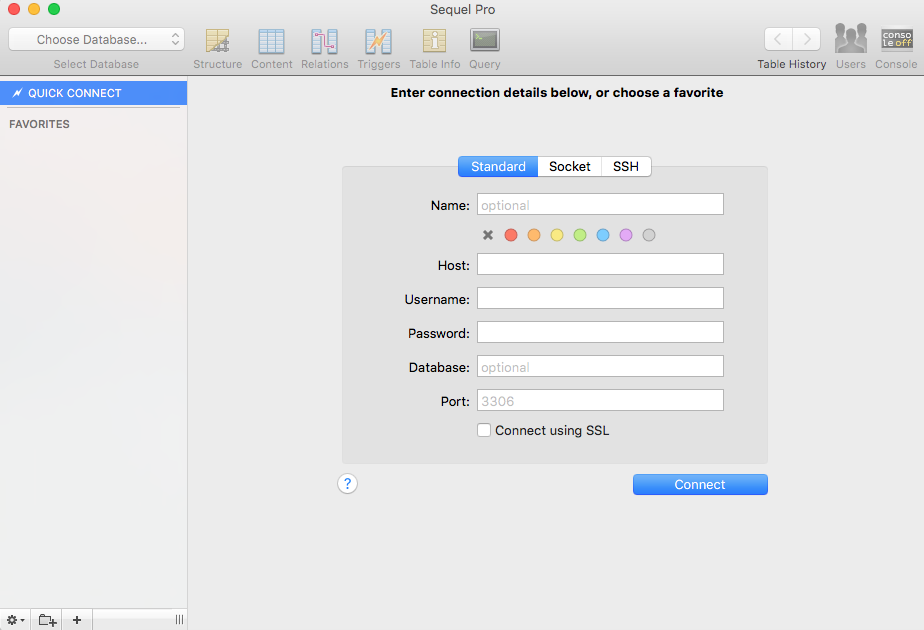
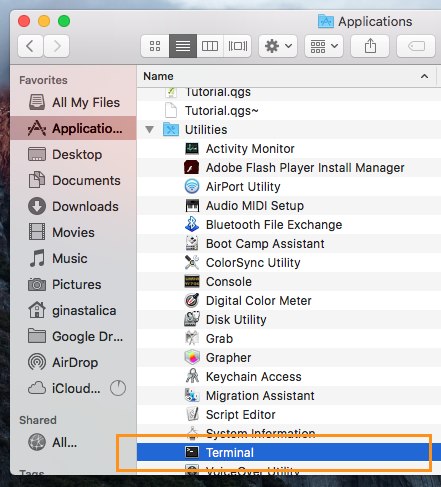
  • Only command line documentation:  This tutorial will really only be useful for those who are looking to use MySQL from the command line in a Linux/Unix or Windows environment.  Anyone who is looking to use MySQL largely from a GUI (a Graphic User Interface, like Sequel Pro or Windows MySQL Workbench) will benefit from other resources.

tl;dr?  Oracle provides a reliable, straightforward tutorial for connecting to MySQL server, creating and using databases, entering queries, and more, all in a Unix/Linux environment.  For users who are looking to use databases using a GUI, other resources will likely be more helpful.

Sequel Pro: Creating a Database

May 8, 2016 By Gina Stalica '16

This walkthrough has been created using this tutorial as a resource.

  1. Start your machine’s MySQL Server instance through System Preferences.  See this walkthrough for assistance in doing so.
  2. Download Sequel Pro here.
  3. Open Sequel Pro.Screen Shot 2016-04-24 at 8.33.09 PM
  4. Create a Standard connection to your MySQL Server, using IP address 127.0.0.1 as the Host and your MySQL root credentials for the Username and Password.  No extra information is necessary.
    Screen Shot 2016-04-24 at 9.16.37 PM
  5. Once connected, you will automatically be in the “Query” section of Sequel Pro, where you will type and run MySQL commands.  In this demo, I will create a database of classmates, but feel free to mimic the syntax used in order to create a database of your choosing.  To create your database, type CREATE DATABASE classmate_database; then press “Run Previous” just below in order to run your code and create your database.
    Screen Shot 2016-04-26 at 8.40.47 PMTo check that you’ve successfully created the database, navigate to the “TABLES” section of the Sequel Pro window and locate classmate_database.
    Screen Shot 2016-04-26 at 8.43.40 PM
  6. In order to work with the database your have just created, use the command “USE” and type USE classmate_database; and run the command just as you did before.
    Screen Shot 2016-04-26 at 8.49.41 PM
  7. Now, you’ll need to create a table in order to add some actual content to your database.  To learn more about the organization of a database or, more specifically, the relationship between a database and its tables, check out this post.  To create the table, unsurprisingly, we’ll use the command “CREATE TABLE” to create a table of classmates and proceed to indicate the primary key column and an initial (unique) column for the database.  Type and run the following code:
    CREATE TABLE classmates (
            student_id INT NOT NULL,
            student_lastName VARCHAR(30) NOT NULL,
            PRIMARY KEY (student_id),
            UNIQUE (student_lastName)
    );
    Screen Shot 2016-04-26 at 9.24.17 PM
    Let’s take some time to understand the code we’ve just used.  CREATE DATABASE is self explanatory; however, it’s important to notice the way we set student_id as the PRIMARY KEY here and set student_lastName as a UNIQUE key.  Both primary and unique keys are indices whose members must all be unique.  Here, that means that no students can have the same ID and that no students can have the same last name (which may not be a realistic assumption).  The primary key is special in that it is used for identification.  In student_id, INT specifies that the column’s values will be integers and NOT NULL indicates that the value cannot be null.  If a null value is attempted for this column, an error will occur.  In student_lastName, VARCHAR(30) specifies that the column’s value will be composed characters with a maximum length of 30.  Here, VARCHAR is used instead of MySQL’s CHAR because VARCHAR allows user to indicate a string of variable length, while CHAR’s declaration indicates a string of static length.  We use VARCHAR here so that last names of different lengths can be inserted into the column.
  8. Now is a good time to check that your table has been created.  Click on the “Content” button on the top toolbar on the Sequel Pro window.  If you find student_id and student_lastName as columns, you have successfully created the beginnings of your database!
    Screen Shot 2016-04-26 at 9.53.31 PMYou can resume coding by returning to the “Query” button on the top toolbar.
  9. Now, let’s add some actual values to our table using the “INSERT INTO” and “VALUES” command by typing and running the following code:
    INSERT INTO classmates
            (student_id, student_lastName)
    VALUES
            (1, “Lastname1”),
            (2, “Lastname2”),
            (3, “Lastname3”);
    Be sure to contain the last name values in quotes and to assign unique id number values to each student.
    Screen Shot 2016-04-26 at 10.06.35 PM
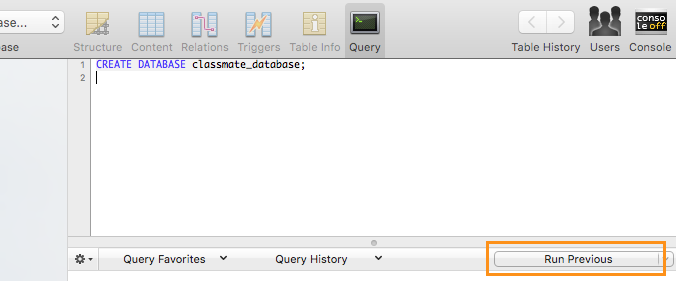
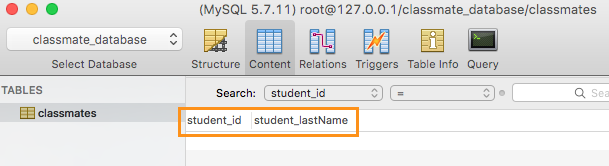
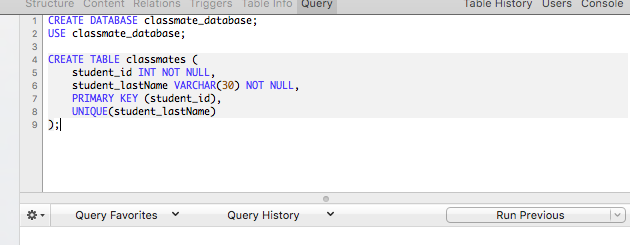
To check to make sure that your data was entered correctly, again navigate to the “Content” button.  If you click to drop the student_id or student_lastName columns down, you should find your data!
    Screen Shot 2016-04-26 at 10.06.50 PM

MySQL Download and Setup: Mac OS X

April 24, 2016 By Gina Stalica '16

The MySQL download can be found here.

  1. Download the Mac OS X 10.10 (x86, 64-bit), DMG Archive.Screen Shot 2016-03-31 at 10.14.22 AM
  2. When download is complete, open the installation packages by double-clicking the package icon.  There will be a pop-up window that provides a temporary password for MySQL’s “root” user.  This password will be a slew of random characters that is crucial to getting MySQL up and running smoothly.  Be certain to take note of this password!
  3. Start your MySQL server instance from your computer’s System Preferences.  To do so, click the Apple icon in the upper right hand corner of your desktop screen.  Select System Preferences.
    Screen Shot 2016-03-31 at 10.47.37 AM
    In System Preferences, locate and double-click the MySQL icon.
    Screen Shot 2016-03-31 at 10.49.04 AM
    Press the “Start MySQL Server” button.
    Screen Shot 2016-03-31 at 10.49.19 AM
    You may be asked to enter a username and password in order to make this change.  This will be your normal desktop username and password. For example, if you are on a Bowdoin computer, this will be your Bowdoin username and password.
  4. From here, you will need to reset your MySQL root user password, which will require working from your computer’s Terminal with root user privileges.  To open up a Terminal window, open up Mac’s Finder.
    Screen Shot 2016-04-06 at 9.15.55 PM
    Locate the Applications folder, from there locate the Utilities folder, and the Terminal should be there.  Double-click the Terminal to open a window.Screen Shot 2016-04-06 at 9.16.42 PM
  5. In the Terminal, type the command: /usr/local/mysql/bin/mysql -u root -p
    Screen Shot 2016-04-07 at 10.58.12 PM
  6. Enter your temporary password and press Enter.  Note that the key icon will not move as you type in your password.  This is normal!
  7. From here, you are connected to the MySQL server from the root!  Screen Shot 2016-04-07 at 10.58.29 PM
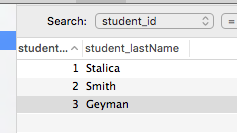
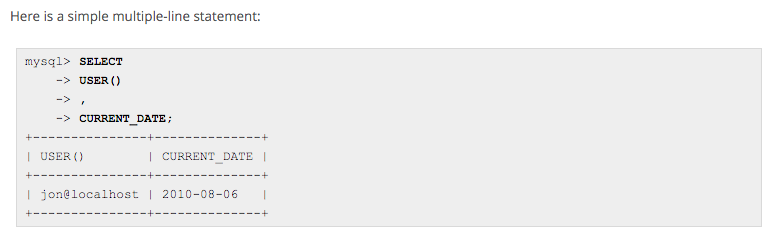
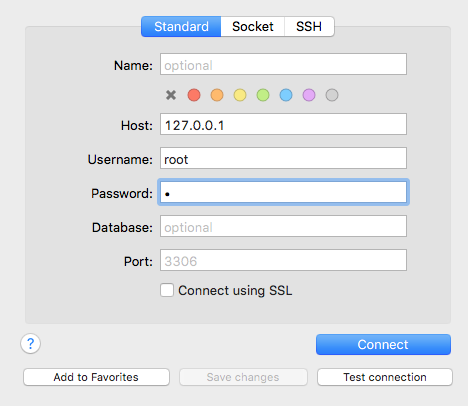
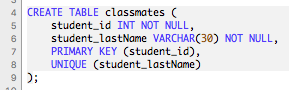
Now it’s time to change your password to something a bit more memorable (and less nonsensical).  Type the command: SET PASSWORD FOR ‘root’@’localhost’ = PASSWORD(‘typeyourpasswordhere’);  Be sure to type the command yourself.  Copying and pasting may cause a problematic difference in formatting.  It’s also worth noting the use of the semicolon here.  In SQL, like many other programming languages, the semicolon indicates the end of a statement, much like a period indicates the end of a sentence.Screen Shot 2016-04-07 at 11.13.44 PM

That’s all there is to it.  If you’ve made it this far without a glitch, congratulations!  You’ve successfully download MySQL, started the server, and have access via the root user with a newly created password.

Tool: XML

April 15, 2016 By Gabriella Papper '18

XML stands for EXtensible Markup Language. It is a language like HTML that allows you to markup your data. You can use XML to markup a letter, documents or other forms of data. One of the most prominent XML editors is called oXygen, which has XML development tools for people with all different skill levels. XML, however, does not have predefined tags. This means that the user decides what the tags are and how the document is going to be structured.

One benefit of XML is that it conveys less tangible information that accompanies data. For example, with a letter, XML enables you to tag areas of the letter that were damaged or areas that had notes in the margins. By using XML, you preserve the information found in physical documents. You can tag your text based on content and/or structure. If you did not use XML and simply accepted the text as data from a machine, you would lose the context of the document.

Data is stored in plain text format in XML. This makes it easier to share data, preserve data, and understand data. The standard markup format in XML is <tag> TEXT </tag>.

Screen Shot 2015-11-17 at 11.09.07 AM             Screen Shot 2015-11-17 at 11.09.15 AM

Original Joshua Chamberlain letter (left) that was then decoded and transcribed in an oXygen file (right). Credit: Ana Timoney-Gomez (created for Introduction to Digital and Computational Studies, Fall 2015).


Tool: GIS

March 25, 2016 By Gabriella Papper '18

ArcGIS is a software program that scholars and researchers in many disciplines use to produce and analyze geospatial data. GIS stands for geographic information system. Spatial analysis is a way to gather information on the locations and features of spatial data. Digital humanists can use spatial analysis to help answer questions about location and visualization.

ArcGIS offers many tools in order to examine spatial data.

Georeferencing puts data into a spatial context. This means that an image can be assigned real-world coordinates. For example, one project georeferenced old maps. Before georeferencing, these maps existed without spatial context or a coordinate system. These old maps were then referenced to modern maps using control points that were found on both maps. Referencing using control points enabled the old maps to become digital representations of a physical space. Georeferencing can also indicate the accuracy of older images.

Screen Shot 2015-11-17 at 10.52.26 AM

ArcGIS Map of Present Day Topo Map and Historical Map of Gettysburg layered on top. Credit: Ana Timoney-Gomez (created for Introduction to Digital and Computational Studies, Fall 2015).

The georeferenced version of the map was adjusted according to control points from a modern topo map. The distortion of the georeferenced map shows that the original map did not have the same spatial context or coordinate system as the modern map. Georeferencing encourages us to look at the details and distinct features found on maps.

Geoprocessing is a tool that enables you to manipulate spatial data, which means that your input data will look different from your output data. Geoprocessing focuses on the features of the input image, such as visibility and terrain.

ArcGIS (and ArcScene) can now also perform 3-D image modelling.

Screen Shot 2015-11-17 at 10.55.59 AM

ArcGIS 3-D image model. The pink color shows what Joshua Chamberlain was able to see at Gettysburg. Credit: Ana Timoney-Gomez (created for Introduction to Digital and Computational Studies, Fall 2015).


Although GIS is an helpful tool if you are working with environmental data, it is also extremely useful in many other areas (mapping, census data, business, health, migration, etc.). ArcGIS now also offers a collaborative web version that allows you to share content and project layers.

Further Reading: The Spatial Humanities: GIS and the Future of Humanities Scholarship edited by David J. Bodenhamer, John Corrigan, Trevor M. Harris.


  • « Go to Previous Page
  • Page 1
  • Interim pages omitted …
  • Page 3
  • Page 4
  • Page 5
  • Page 6
  • Page 7
  • Interim pages omitted …
  • Page 9
  • Go to Next Page »

Digital and Computational Studies Blog

research.bowdoin.edu